| Planning the Installation |
|
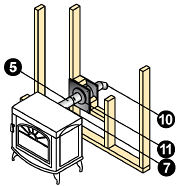
1. Refer to the Typical PelletVent Pro Installations diagram, on this page, to be familiar with some of the standard PelletVent Pro installations and the required component parts.
2. For a horizontal termination, you will need a Wall Thimble and a Horizontal Cap. The cap
must be installed with a 6" clearance to the outside wall (refer to appliance manufacturer’s
installation instructions for other clearances).
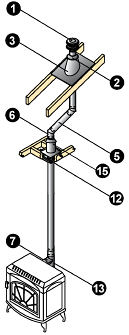
3. For a vertical termination, you will need a Cathedral Ceiling Support Box or Flat Ceiling
Support, Attic Insulation Shield (if passing through an attic), Flashing, Storm Collar, and
Vertical Cap.
4. Determine the length of PelletVent Pro pipe required. For a vertical termination, measure the pitch of the roof and select the proper flashing. The required minimum height above the roof is 12".
5. Pellet stove inserts in masonry fireplaces will require a flex pipe to snake the vent past the
smoke shelf. For transition from PelletVent Pro to an existing DuraPlus, DuraPlus HTC, or
DuraTech Chimney, a Chimney Adapter is available.
6. For vertical rise of PelletVent Pro on the outside of the house, Wall Straps should be used at 4' intervals to provide proper support.
7. Check to be sure that the appliance and the venting system are in compliance with all minimum clearance to combustible requirements.
|
Important: Always use common sense and good
construction/installation practices and comply with
all local fire codes. Take the time to read the
pellet stove/insert manual and the Installation
Instructions for Dura-Vent PelletVent Pro. If
you feel unsure about any installation issues we
recommend you consult with a licensed contractor,
building official or fire marshall.
| Helpful Information |
-
The inner pipe diameter
should match the outlet size of the
appliance. For installations that
require 4” vent and the appliance
has a 3” outlet, use an Increaser
Adapter 3”-4”.
-
Check the appliance
manufacturer's installation instructions
to confirm which types of vent configurations
are permitted (i.e. horizontal, vertical,
chimney reline, etc.). Also, check
for any venting restrictions such
as maximum horizontal run, minimum
and maximum vertical rise, maximum
offset, etc.
-
Avoid long runs and
excessive use of elbows. Refer to
the
appliance manufacturer for minimum
rise and maximum run
configurations for the venting system.
-
Use a Single Tee with
Clean-Out Tee Cap to facilitate easy
cleaning. It is recommended to use
a tee off the back of an
appliance.
-
Maintain the minimum
1" clearance (air space) from vent
pipe to combustibles. Use proper support
and bracing.
|
|
|
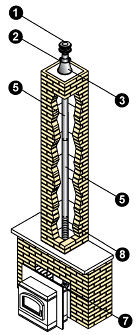
| Typical PelletVent Pro Installations |
 Pellet Insert
 |
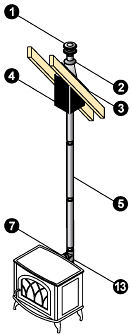 Cathedral Ceiling
Stove Installation |
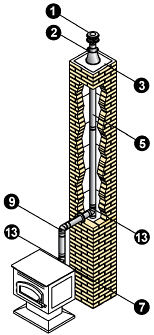 Masonry Chimney
Relining |
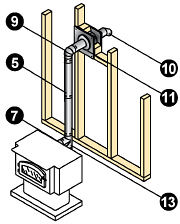 Through-The-Wall
Vertical Rise |
 Through-The-Wall
 |
 Attic Offset
 |
|
Component Key
| Diagram # |
Component
|
|
1
|
Vertical Cap
|
|
2
|
Storm Collar
|
| 3 |
Flashing |
|
4
|
Cathedral Ceiling Support Box
|
| 5 |
Straight Length Pipe |
| 6 |
45° Elbow |
| 7 |
Appliance Adapter |
| 8 |
60” Flexible Length |
| 9 |
90° Elbow |
| 10 |
Horizontal Cap |
| 11 |
Wall Thimble |
| 12 |
Ceiling Support Firestop Spacer |
| 13 |
Tee w/Clean-Out Tee Cap |
| 14 |
Wall Strap |
| 15 |
Attic Insulation Shield |
|
M&G DuraVent provides no warranty for the following professional
products if such products are not installed by a trained professional
installer: DuraTech®, DuraPlus HTC®, DuraChimney®
II, PelletVent Pro®, DirectVent Pro®, FasNSeal®, FasNSeal®
W2, FasNSeal® Flex, and PolyPro®, and M&G DuraVent’s
relining products including DuraLiner®, DuraFlex® (SW,
Pro, 316, 304), and Ventinox®.
• Any M&G DuraVent product sold by a non-approved
website will not be warranted.
• Any customer that has bought product from
a non-approved website will not be given technical assistance
or support from M&G DuraVent.
• Any website not compliant with this Internet
Sales Policy shall not use M&G DuraVent’s trademarked
and registered properties, and will be notified to remove them
immediately. DuraVent reserves the right to enforce its intellectual
property rights against entities not in compliance with this Internet
Sales Policy.

|